My Hands Are Like The Waco Kid
So it's helped me a lot when I discovered that I could easily automate the resizing of photos using mac's Automator. I have always ignored this icon in the applications folder. So it was to my surprised delight that it can be an extremely useful utility.
Hey Little Guy, You Can Serve A Purpose!
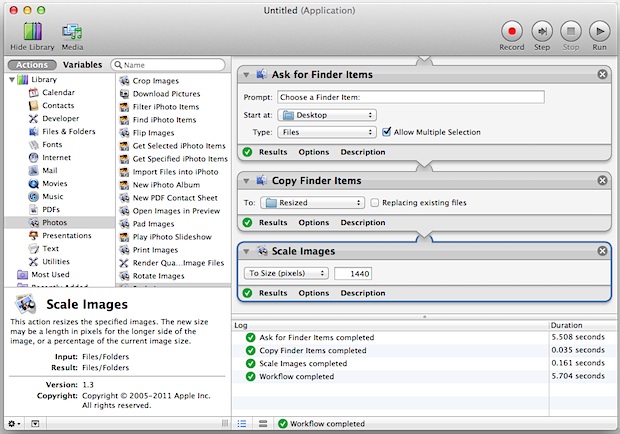
I'm not going to rehash the instructions for doing this, since they are clearly explained here. But just in case that post gets deleted and I hit my head with a falling piano and forget how to do it, I'll repost their screen shot:
For Prosperity!
Wait. Is that enough? I mean a piano could cause a pretty severe memory issue. I pride myself on original content in this blog, but this is for the greater good. Okay, well just in case, this is a direct step-by-step taken from the link above:
How to create an Automator application that will resize a group of pictures:
- Launch Automator and select to create a new Application
- From the left side Library menu, click on “Files & Folders” then double-click on “Ask for Finder Items”
- Now on the right side set the “Ask for Finder Items” choice to ‘Start at’ the Desktop and then click the checkbox next to “Allow Multiple Selection”
- Next, from the same Files & Folders menu, find and double-click on “Copy Finder Items”
- From the right-side pull-down menu alongside “To” choose “Other” and create a new folder called “Resized”
- Optional: Again from the library, double-click on “Rename Finder Items” to add that action as well
- Optional: From the pull-down menu choose “Add Text” and in the box below add “-resized” to appear after the file name
- Now click on “Photos” from the left side Library menu, then double-click on “Scale Images”, and select the resized pixel width of images
- Run the workflow to test it, otherwise choose “Save” to create an application that allows for drag & drop resizing of groups of images
2) Making Photos Look Like Coloring Book Pages
There have been several times in my teaching career where I needed to change a photo into a coloring book page. When I was teaching preschool in South Korea it's because I wanted the children to color themselves. More recently though it's because I make classroom money for our class economy, and I think it's only fitting to have the students featured on each denomination in our classroom currency.
There's a couple ways to do this. I'll demonstrate both by using Adobe Photoshop CS 5 and this photo:

"I'm About To Be Changed Into Money!"

"Not As Glamorous As I Was Hoping"
That's the easy way. The next way produces an image a little clearer, but takes a lot more work. Again, I didn't create this method. It's posted in various places on the internets. Here's one of those places.
STEP 1
- Duplicate The Background Layer
First duplicate the background layer. Go Layer> New> Layer via Copy. Now we have 2 layers, the Background Layer, and Layer 1.
STEP 2 - Desaturate The Photo
With Layer 1 selected, choose Image> Adjustments> Desaturate. This gives us a grayscale version of the photo.
STEP 3 - Duplicate Layer 1
At this point you must duplicate Layer 1. With Layer 1 selected, go Layer> New> Layer via Copy. Now we have 3 layers, the Background Layer, Layer 1 and Layer 2.
Next we'll be working with Layer 2.
STEP 4 - Invert Layer 2
With Layer 2 selected, go Image> Adjustments> Invert. This will make your photo look like a negative.
STEP 5 - Change The Layers Blend Mode To Color Dodge
In the Layers Palette change the Layers Blend Mode for this layer (Layer 2) to Color Dodge. This will make your photo almost completely white, but don't panic! Everything is going to work out just fine.
STEP 6 - Apply The Gaussian Blur Filter
Go Filter> Blur> Gaussian Blur. When the dialog box appears start by moving the Radius Slider all the way to the left. Once you've done that you can start to slowly move it to the right.
If you follow the 6 steps, you'll get a result that resembles this:

"My Shading Feels More Subtle"
Although this method is 5 more steps, I like the results more. It works better for our class currency too:

"Imagine What I Look Like On Bright Orange Paper!"
3) Spicing Up Photos
I've written about using Photofunia to make normal photos fun and exciting for my students. I do want to update that initial post by sharing the complete list of photo web filters I use. Here are my bookmarks I use when I want to play with a photo:
I won't talk about all of the above links, but I do want to feature a few.
A) PhotoFunia: This is still my favorite place to alter a photo's reality. There's just a great big huge selection. I would have the children choose their own way to manipulate their photo, but there are a few inappropriate filters for 9 and 10 year olds, so I still choose for them. But I do give them choices.

I Guess There's A Third Way To Put Our Faces On Money
B) FunPhotoBox: Runs a close second to Photofunia. Just like Photofunia there are a lot of original, quality options. And what's really cool is the creativity of both sites really don't overlap.

Well, We Do Live In Nepal
C) Pho.to: Is an interesting site that has a lot of potential. It offers a variety of ways to manipulate photos. The filters seem to be a bit lazy in quality, but there are a ton of choices. One sub-category is branding the subject of the photo with flag face paint. Unfortunately there are only 16 countries offered, and all are from Europe. This would be cool for an international school if they included a lot more countries.

The Stripes Of Spain
No comments:
Post a Comment